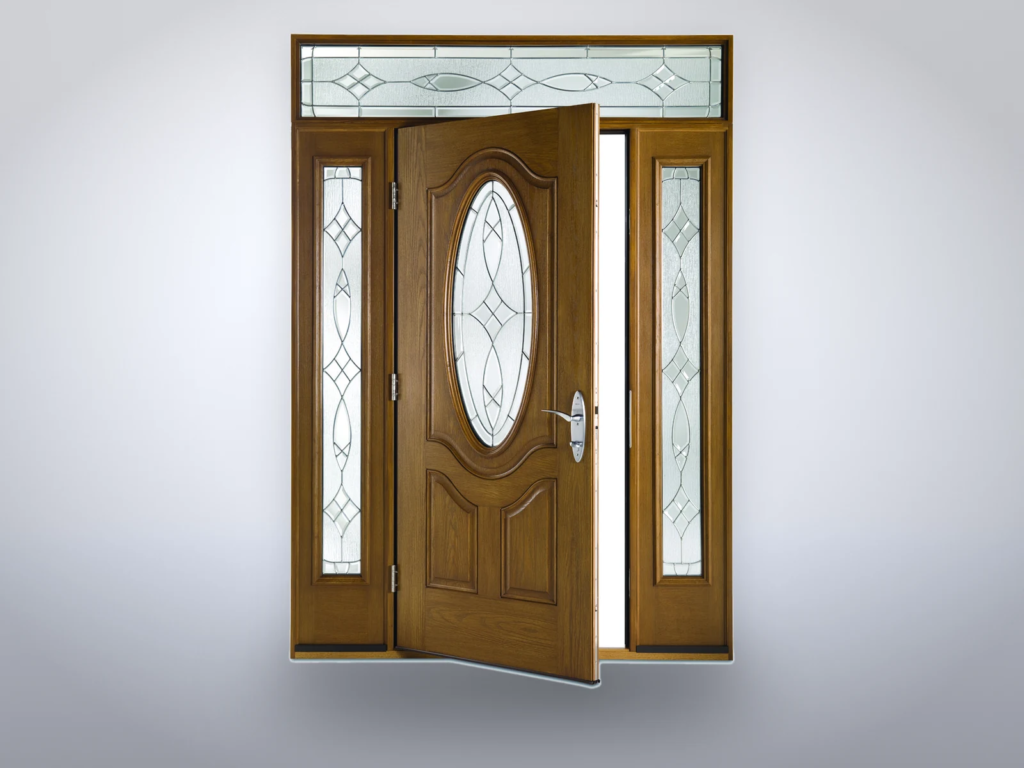
Daylight around a closed entry door helps you locate a leak before you replace door weatherstripping. A Therma-Tru entry door seals in four places: the weatherstrip in the frame, a pad at each bottom corner, the sill and a sweep under the door. Its troubleshooting table also blames a loose or sagging door for the same leaks. A door that doesn't press on its strip will leak with a new one too. The steps here come from Therma-Tru's 2015 owner's manual and from replacement sheets by Endura, which makes sills and seals for entry doors. They fit prehung steel and fiberglass doors (sold already hung in their frame) whose weatherstrip presses into a slot in the frame.
Parts and tools
- Weatherstrip made for your door (Therma-Tru sells side pieces in long, medium and short reach)
- A small flathead screwdriver and needle-nose pliers for pieces that tear
- Scissors, a tape measure and a marker
- A dollar bill for testing the gap under the door
- For a new door bottom: a helper, a Phillips screwdriver or drill, a putty knife, exterior-grade caulk and a saw
Bring a piece of the old strip or the door maker's name when you order. We'd buy the door maker's own strip where you can get it. Three reaches of one part tell you a single profile doesn't fit every door, and Therma-Tru sells its parts online and through its dealers. For the door bottom cut, Endura strongly recommends a chop or miter saw.
Find where the air gets in
On a bright day, look around the closed door from inside. Therma-Tru lists light and air leaks together, so note where you see daylight before choosing a repair.
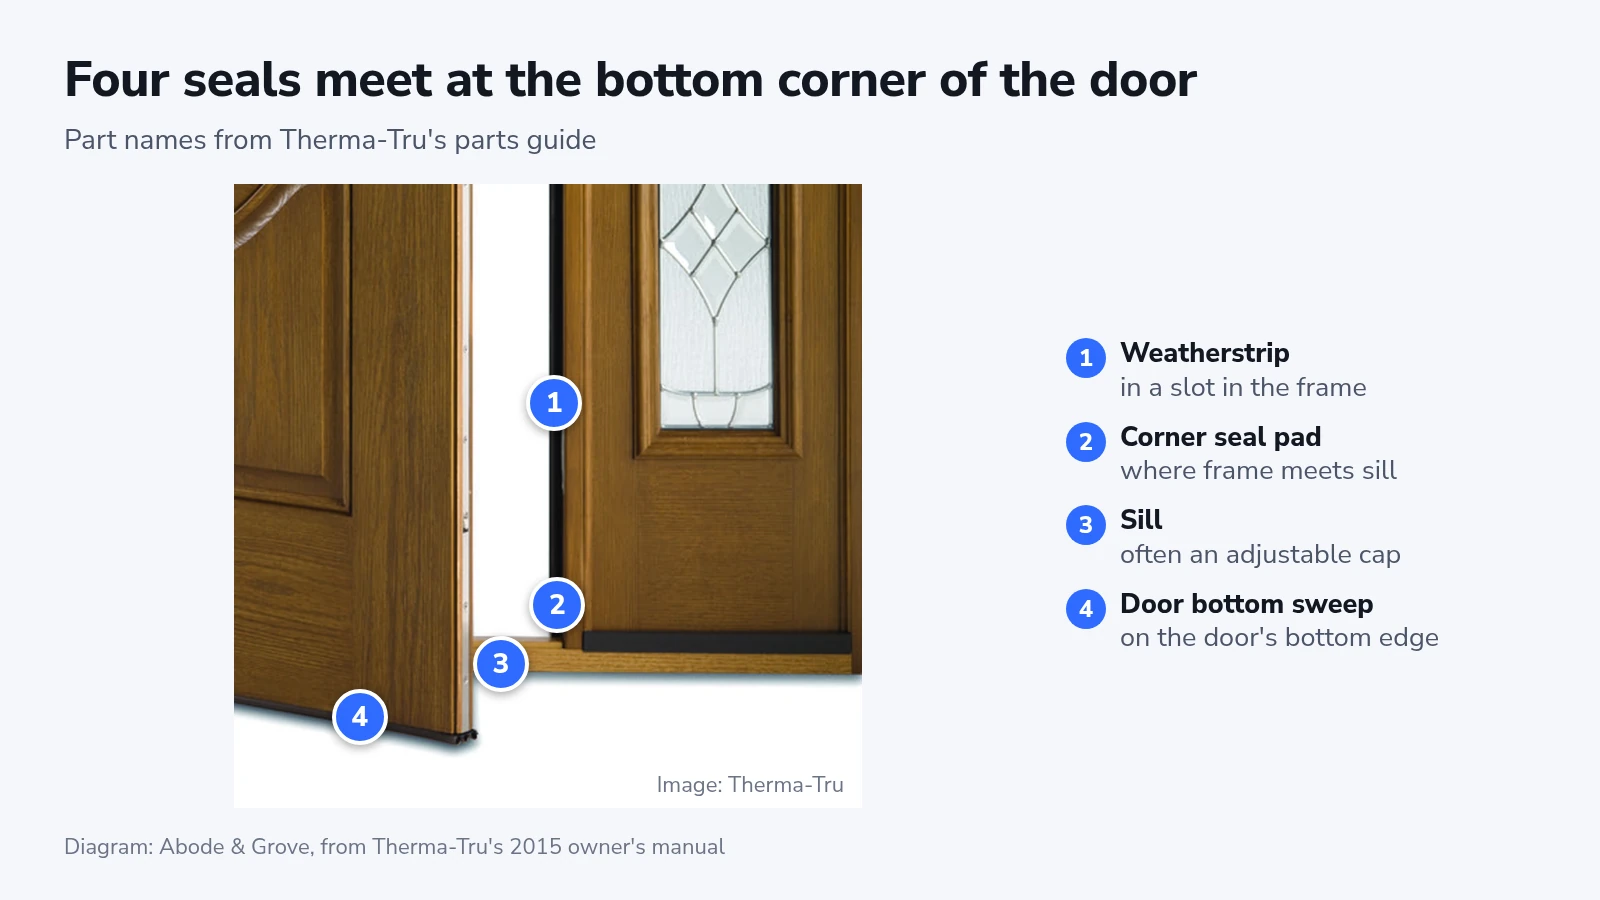
Daylight along the sides or top can point to a failed weatherstrip or a door-fit problem. At the bottom, inspect the corner pads, sill and door bottom together. The bill test helps assess the seal, but does not identify every cause of a leak.
Check the door's fit before buying parts
Therma-Tru's troubleshooting table names three faults in the door itself that leak like a worn strip:
- The door moves in and out when it's latched. Move the adjustable strike plate in, so the latched door presses on the weatherstrip.
- The door sags, with an uneven gap along the top. Therma-Tru's fix is long screws in the top hinge, driven through the jamb into the stud. Its installation steps use #10 x 2-1/2 inch screws in the holes nearest the weatherstrip.
- The door hits the strip at the top or the bottom first. The lock-side jamb has to be realigned and reshimmed, which is a job for the installer.
Therma-Tru treats a painted strip as a damaged one and says never to paint or stain the weatherstrip. It's friction-fit, so it pulls out before you paint the door.
A strike adjustment or a longer screw costs next to nothing, so do these checks before you buy a strip.
Replace the weatherstrip in the frame
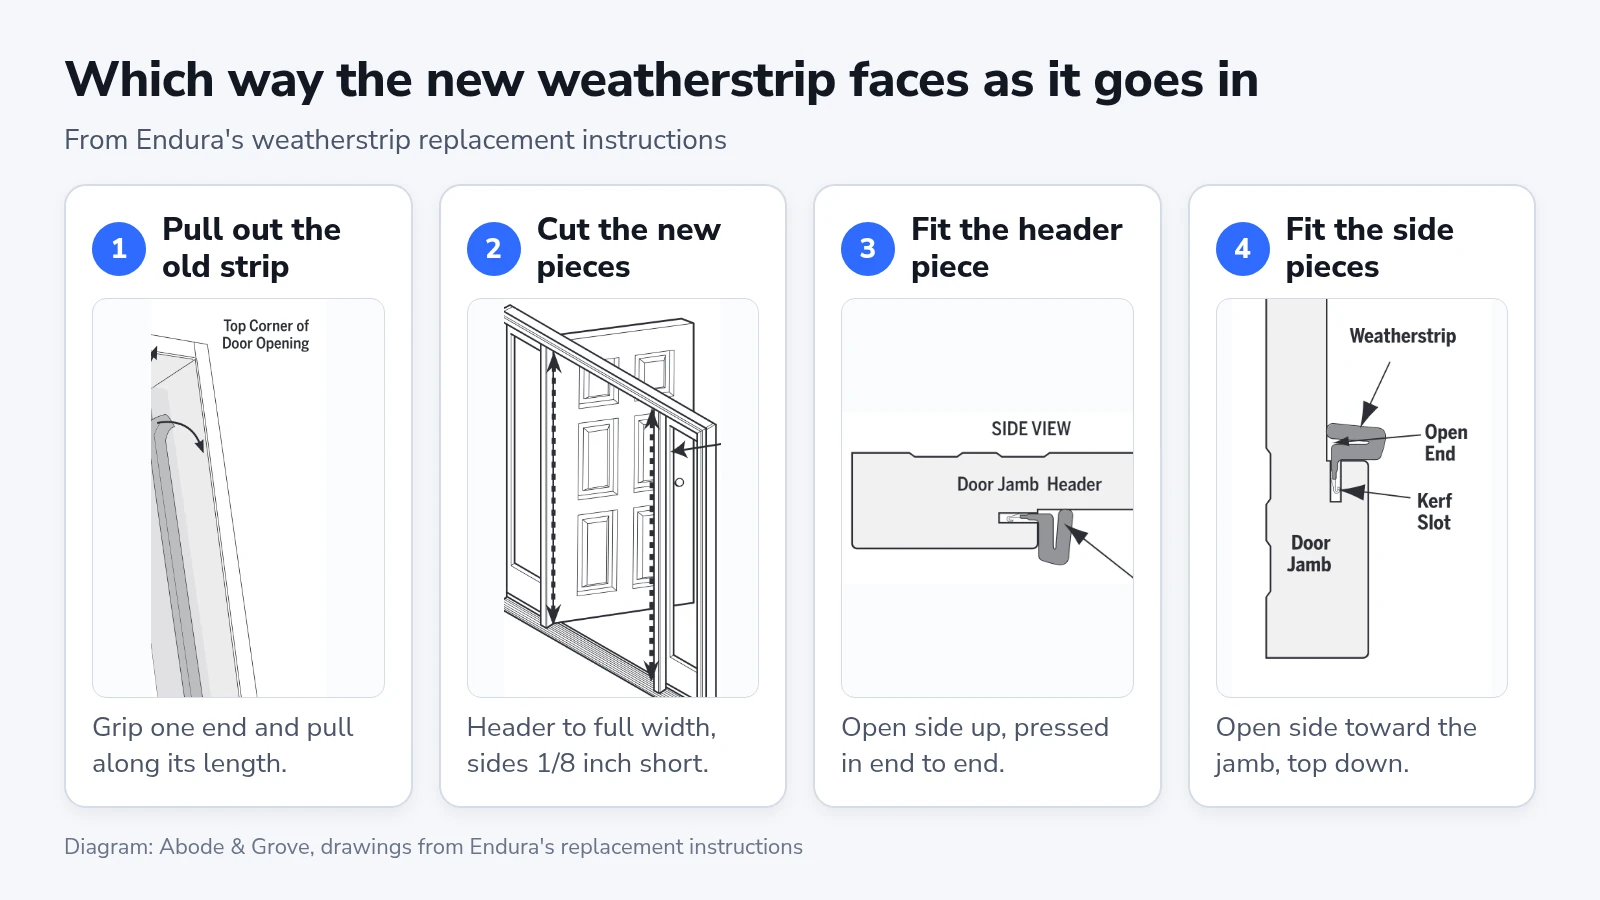
Note which way the old strip's open side faces before you pull it, so the new one goes in the same way. Then work through Endura's sheet:
- Pull out the old strip. Grip one end and pull it from the slot along its length. If it tears, work the pieces out with a small screwdriver or needle-nose pliers, taking care not to gouge the frame. Then clean the header, both jambs and the bottom corners.
- Cut the new pieces with the ends square. Cut the header piece to the full width of the header. Measure each side jamb, subtract 1/8 inch, and cut the side pieces to that length.
- Fit the header piece. Push the thin fin along its back (Endura calls it the kerf) into the slot with the open side facing up. Butt one end up to the side jamb at the top corner, and press the strip in along its whole length.
- Fit the side pieces. Push the kerf into the slot with the open side facing the door jamb, starting with the top end tight to the header strip. Press it in from the top down, then repeat on the other side.
If you replace all three frame pieces, check that the new header and side strips meet tightly at the corners. Replacing only a torn side piece will not fix a flattened header strip or another failed seal.
Set the sill cap with a dollar bill
Your door may have an adjustable sill cap, a strip along the sill that moves up and down on screws hidden under plugs. Raising it closes a gap under the door with nothing more than a screwdriver, so try it before you buy a new door bottom.
- Close the door on a dollar bill over one of the plugs and pull the bill out from inside. Therma-Tru wants it snug and slightly hard to pull, but it should come out without tearing.
- If the bill slides out easily, pop out the plug over the nearest screw.
- Turn the screw a little, close the door and test again.
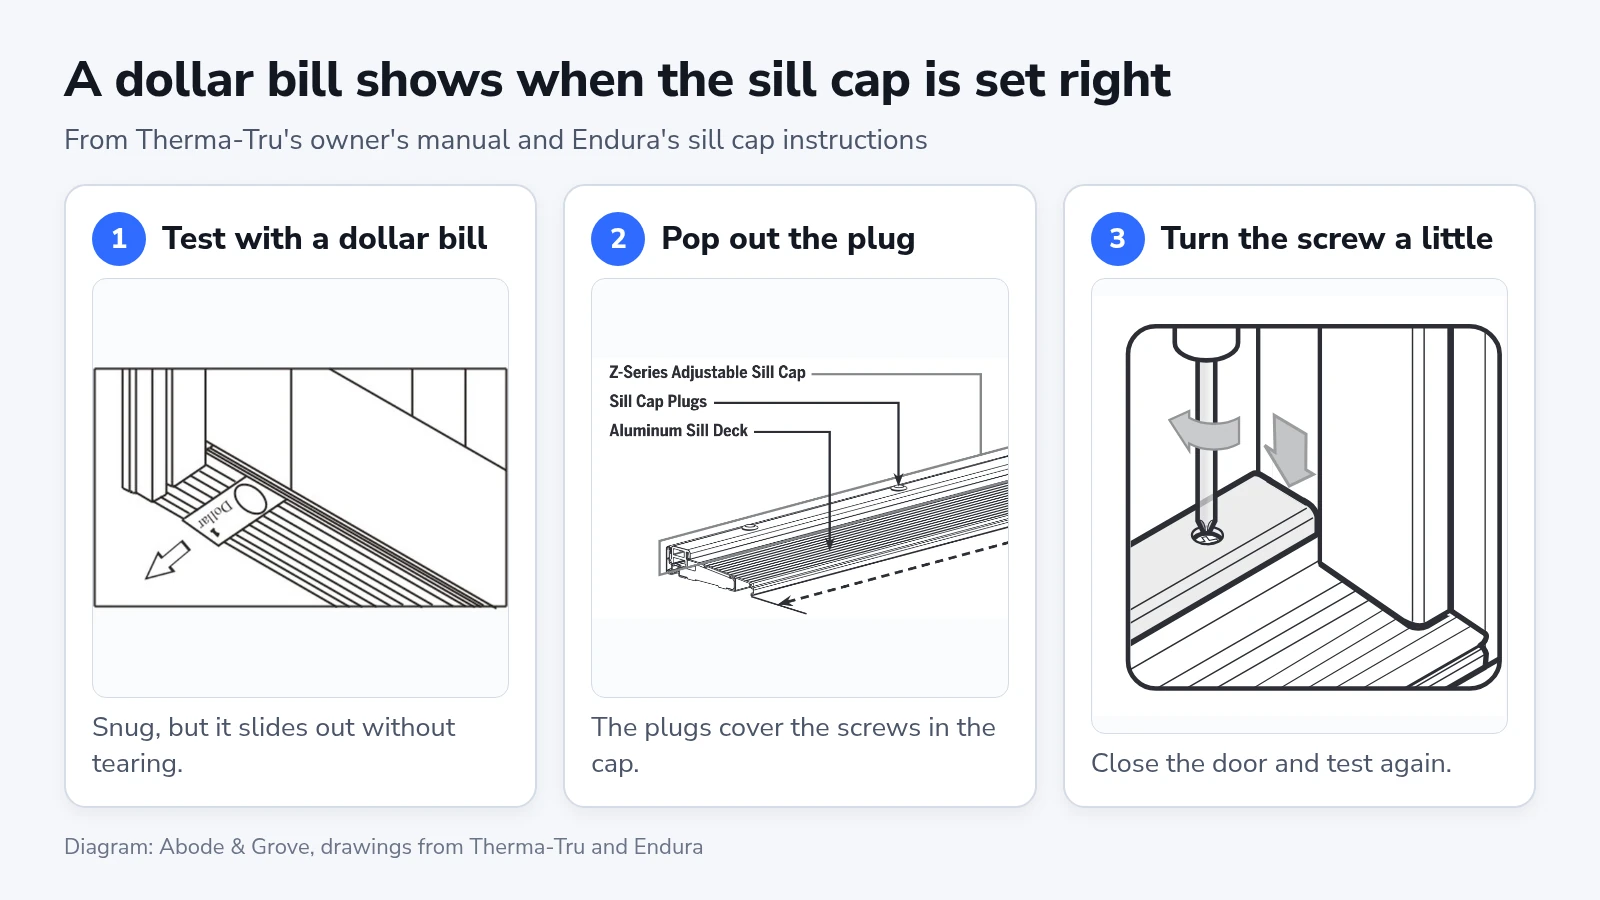
Repeat the test at every plug along the sill. Neither maker's sheet says which way the screw turns to raise the cap, so give it a quarter turn and retest. If the bill comes out easier, go the other way.
Endura’s drawing gives a 7/16 to 15/32 inch door-bottom sealing dimension. The limits are 1/32 inch apart. Follow the instructions for your own sill, and use the bill test to check for an even seal rather than trying to force every threshold to that dimension.
Replace a torn door bottom
If adjustment does not produce a seal, inspect the door bottom and sill before replacing parts. Therma-Tru lists split, cracked or detached rubber as reasons to replace the door bottom. A distorted sill or misaligned frame needs a different repair.
- With a helper, open the door and unscrew the hinge plates from the jamb. Carry the door to a flat surface where it can lie down, such as a pair of sawhorses.
- Take off the old door bottom. Undo its screws, or pry up one end with a flathead screwdriver if it's pressed in. Scrape off old residue and staples with a putty knife.
- Measure the width of the door, mark the same width on the new door bottom from one end, and cut it there.
- On a kerfed door bottom, check the notch in the legs at the cut end. If it's shorter than 1-1/4 inches, cut the legs back to 1-1/4 inches. Cut them as close to the door bottom as you can so it sits flat.
- Run exterior-grade caulk along the edge that will face outside and over both ends.
- Line one end up with the lock-side edge of the door and press the door bottom on, flush along its length. Fix a screw-on one with screws in the middle of their slots. Tap a kerfed one's legs fully in with a rubber mallet and staple each end with a 1/2-inch staple, then wipe off the extra caulk.
- Rehang the door with the same screws and check that it opens and closes properly.
Reseal the bottom corners
Corner seal pads close the bottom of each jamb, where the weatherstrip ends at the sill. Therma-Tru says to replace them when they're torn or missing. Peel the old pad off the jamb. Before the new pad goes on, Endura's sheet has you caulk the joint where the sill cap meets the jamb, along the cap's front and top edges. Peel the backing off the new pad and press it onto the jamb with its bottom flush on top of the sill cap. On a Therma-Tru pad, the tab goes at the top and the narrow part at the bottom.
Frames with no slot
A frame with no slot needs its weatherstrip on the face of the door stop instead. M-D's door jamb weatherstrip kit, made for doors up to 36 inches wide, works that way. Its sheet says to measure along the stop from the threshold to the top of the door and cut both long strips to that length. With the door closed, fasten each long strip to the stop so its vinyl bulb presses on the door. Then cut the top piece to fit snugly between the side strips, so the corners don't leak. In a steel frame, drill pilot holes first.
If it still leaks
Therma-Tru traces water at a bottom corner to a broken seal where the sill meets the jamb, among other causes. Its fix is to remove the corner pad and pull the weatherstrip out at the bottom. Run a bead of polyurethane or elastomeric sealant along the whole joint, then put the strip and the pad back.
Therma-Tru's table says a sill that humps or dips more than the door bottom can seal has to be anchored with new screws. A frame out of square needs a jamb leg freed and reshimmed. Both are work for the installer or a carpenter.
The yearly check
Close the door on a sheet of paper at a few points along each side. ENERGY STAR gives this test for windows: if the paper moves back and forth easily, the seal could be tighter. Then repeat the dollar-bill test at each plug along the sill.
Therma-Tru tells owners to inspect the door at least once a year. Its list includes weatherstrip that no longer seals and worn door bottom or sill gaskets. We'd do it in the fall, before the heat goes on.
Sealing a door makes the room beside it more comfortable. ENERGY STAR notes that door and window projects can save less energy than work in the attic and basement, so if the heating bill is the worry, the attic is the next job.